Pages

Tuesday, October 22, 2013

My Day...with Authentique Paper!

Jazzed...Excited...Freaked Out...Stoked...Ecstatic...

All these describe how I feel today.

I have the HONOR of being the featured Guest Designer today for on of my favorite companies Authentique Paper.

If you are a follower of scrap companies, you know that Authentique has only been around a few years, but has really made a SPLASH in a short time. Their patterns and colors are versatile, while the texture and weight of their paper makes them VERY easy to work with and do all types of crafts. Their stickers sheets (they call them "details") comes with words, alphas and every kind of embellishing sticker combo you would ever need!

For this guest spot, I was sent their "Thrilling" Collection. Full of a variety of oranges and vintage images, it was a lot of fun to play with.

For the complete post, head on over to Authentique Paper's Blog.

Here are a few more pics that didn't make it into the post and a quickie tutorial!

First UP... 
My "Thrilling" Shadow box


The "shadowbox" is actually a fake. It's just a chunky 12 x 12 canvas, turned backwards!

The frames and bow are made from dies by Vicki Chrisman for Accucut and the bottles are 7Gypsies.

Everything else is just paper, glue and Authentique Details Stickers.

Here is a couple of new closeups!


NEXT...
"Any Excuse to Dress Up" Mixed Media Canvas


I really wanted to do one piece that was just crazy and fun. 

I started out by making a 5 Origami Dresses from the Authentique 6 x 6 pad from the "Thrilling" Collection.

My original idea was a little different, but when I decided on this 20 x 10 canvas from Hobby Lobby, I decided to narrow my dresses to just 3.

Here is where I found my tutorial for my dress: Origami Dress Tutorial. It was my favorite out of all the ones I checked out.

A little tip here...during the step where you are folding up to make the bodice, flip the project over to make sure your bodice is all enough for your project. Mine was not and I actually cut the tops off my origami dress and hand-cut new ones.  Took some time...don't make my mistake! LOL. 

All of the dresses are set on a stack of corrugated cardboard scraps to give them height off the canvas.

Here is a close-up of all three dresses:

It's hard to tell in picture, but for the Peacock Dress, all the turquoise you see on the skirt is bling that I bought at Hobby Lobby. The fact that it came in long "sheets" of 10 x 60 helped fill the skirt in pretty fast. 


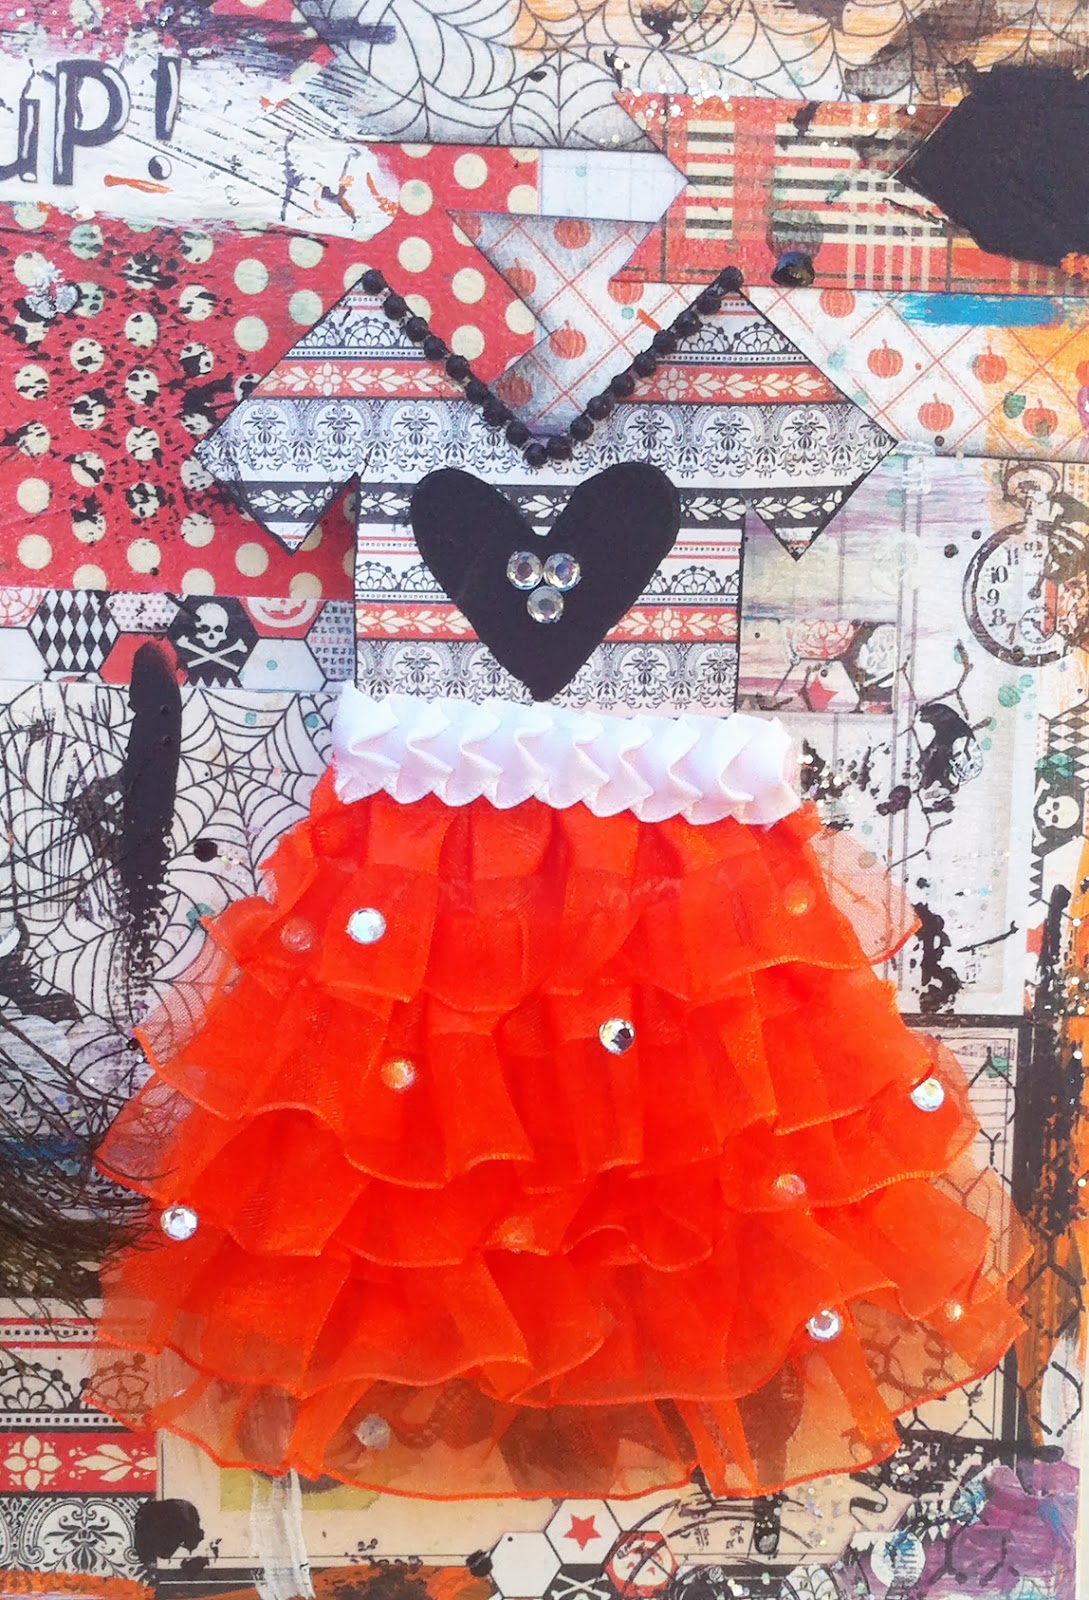
This skirt is made of layered ruffle ribbon, loose bling and some additional ribbon. The heart on the shirt was made with Modeling Paste and a Heidi Swapp Stencil.  


This is my favorite! Think: Couture Bride of Frankenstein. She's got her pats and spiderweb's that are covered in glitter glue, tons of loose feathers make up her skirt, along with a "diamond" waistband and orange birdie for good luck. 

For the background, I Modged Podged paper from the "Thrilling" Collection, before splattering and painting it up with glitter glue, acrylic paint, Tattered Angels and Modeling Paste colored Black through a Heidi Swapp Stencil.

Lastly....
"Monsters in the Trees"


Here is a quick tutorial on how to make this background:

1) First...paint you wooden piece with acrylic paint. I actually added a little gloss medium to my 2nd and 3rd layers because I decided I wanted more gloss. You can see the difference in the finishes:


2) I used a Forrest Stencil from Crafter's Workshop (it's one of my favorites!) The size is 6x6, so it was perfect for my 5x7 piece. 


3) The medium I used for my background is Viva Inka Gold in Gold and Silver.

4) Starting with my silver, I used a putty knife to draw my rub over my stencil. I would then occasionally grabbing a little of the gold as well. Continue this process until you have covered your whole stencil. 


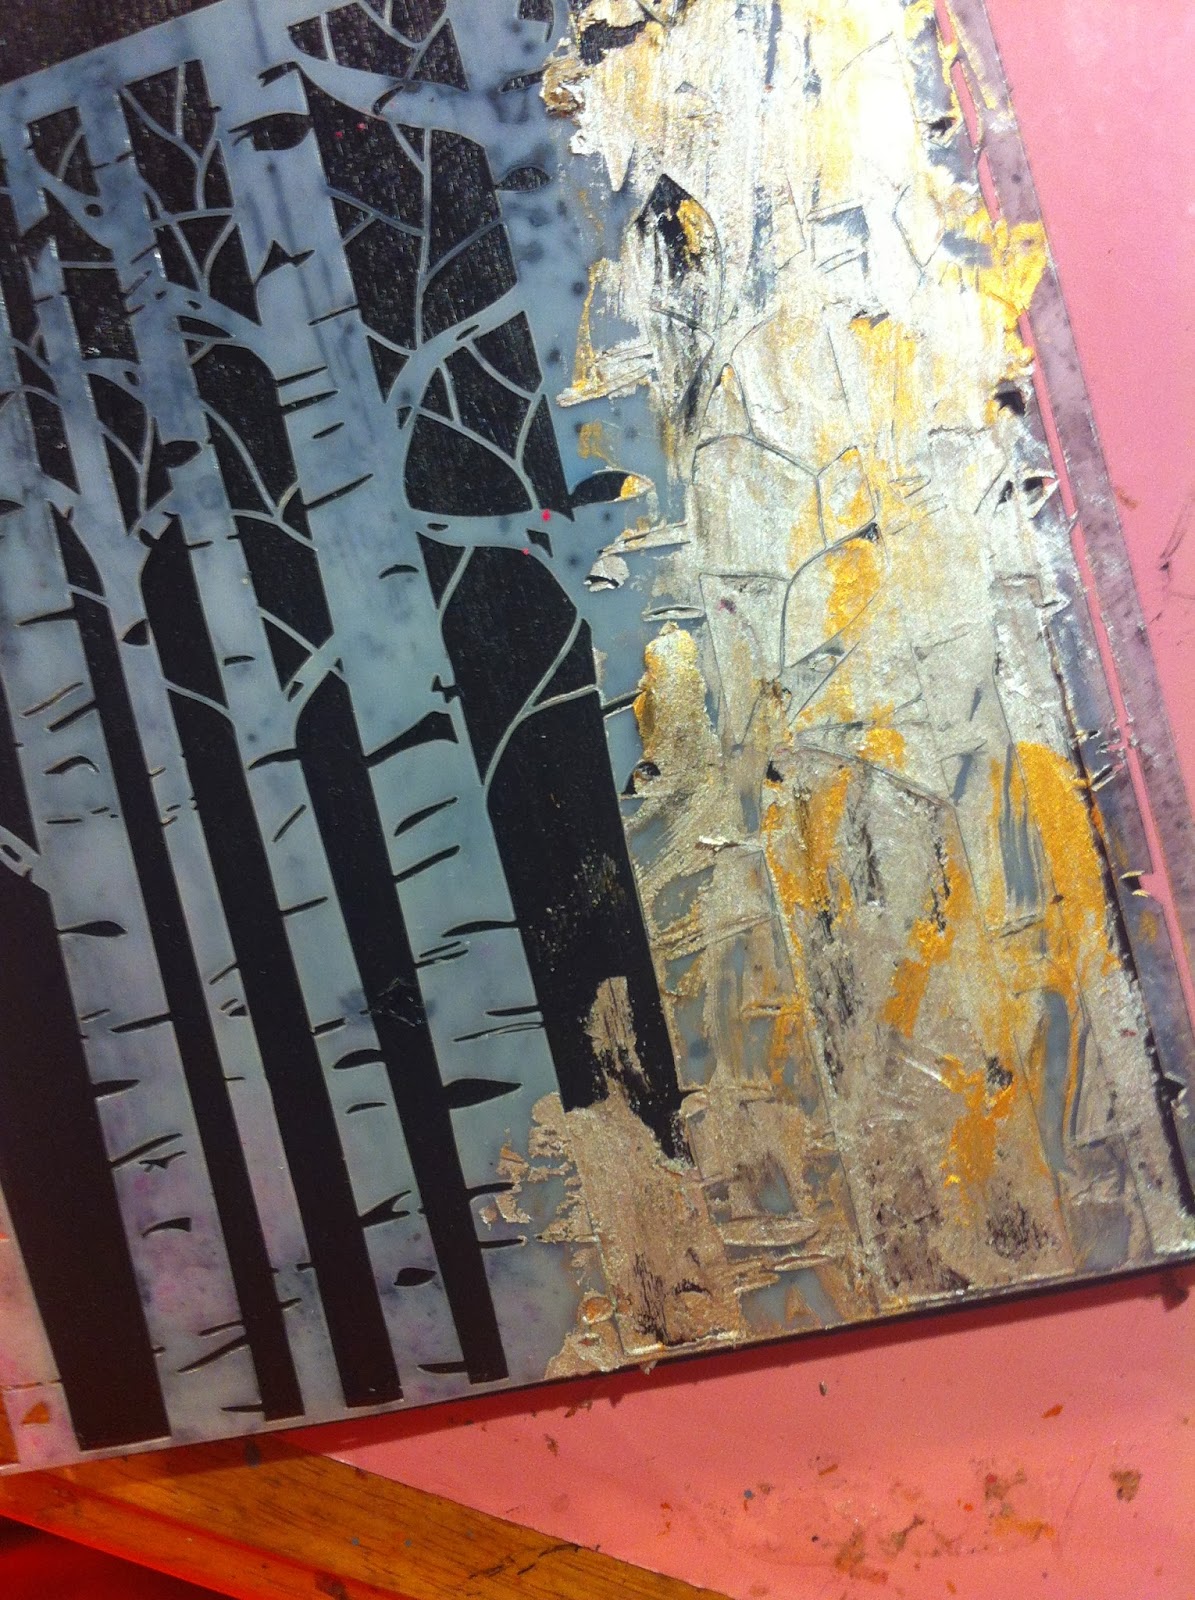
5) Carefully remove your stencil and your done! Inka Gold is very good for this technique because it is so thick that it doesn't seep under your stencil. As you can see, all of the edges are very crisp.


I didn't go all the way to the top because I knew I was planning a big collage of elements up there. Once my elements were in, however, you'll see that I went back in at the very top and added a little bit more with my stencil. It made the piece more "finished." 

It has been "Thrilling" being a guest designer for Authentique Paper and hope I get to do it again sometime.

Remember...you can go here-Authentique Paper Blog-for more pictures and the full blog post.

Until next time...stay creative!

XOXO,
KERI

Wednesday, October 16, 2013

UPGRADE!!

Hello Followers!

I'm so excited to share some news with you all!!

As you know I have had the awesome privilege of being a guest designer for my new friend Susan K. Weckesser over the last 6 months.

This past Saturday she released her new 2013 Design Team and guess what...what I'm on it!


I am honored to be named with these other amazing artist and I can't wait to share with YOU some amazing creations featuring Susan's products!

Inspiration...coming soon!

XOXO
KERI

Wednesday, October 2, 2013

One Pic Wonders

Recently I was going through some scrapbook layout pictures for a design team call (fingers crossed! LOL) and I noticed a trend...I tend to only scrap 1 picture on a layout.

I tried to figure out why I do this and here's the 2 answers I came up with: 

1) I like products...so, if I have too many pictures, it just doesn't leave a lot of play room.

2) I tend to only print out pictures that I absolutely LOVE, so I don't usually have multiples from one event on hand when I start a project (and who wants to stop working to run and pick up pics from a 1 hour place!?)


Here are 2 of my most recent "One Pic Wonders!"

"Cheryl"


The Beautiful Lady in this picture with me is the fabulous Cheryl Boglioli. I met her a few CHA's ago and there was an instant connection. She is my birthday twin (March 13th!), my soul sister and my mentor. She has been amazing to answer all my questions as I jumped into trying to "be creative" for a living. She has supported me in taking steps that were scary and is just all around fabulous.

I used Glitz's Design's "Color Me Happy" line because the name and colors were just so appropriate! 

I wanted to layout to feel like it was a bunch of pictures kind of just thrown on a desk, so I cut my paper all in similar sizes and shapes to my picture.

Getting the whole story of us on a page was going to be a little difficult, but I didn't want to do "hidden journaling" since the whole purpose of this layout was to tell about us. So I decided to journal in sections around the center focus and then connect them with a "follow" arrow, to make it easier to read the journaling in order.

Adding a little washi tape (by Queen and Co and The Paper Studio) added some fun elements and a splash of color to finish it off.

"You're Never Blue When You have Cousins"


I made this layout for a color challenge for Scrapbook News and Review Magazine, but I wanted to go beyond the obvious of making it blue in color, but since BLUE can also mean sad, I had to think kinda hard to come up with some way to use it that wasn't depressing! LOL.

I came across this picture of my two oldest kiddos and my nephew and I love it because they are SSSOO HAPPY together...hhmm...I thought...happy is the opposite of sad...sad means blue...that was my angle!

I started with a sheet of Pink Paislee's Mistables Paper in a hexagon shape and used a couple colors of Tattered Angels mists to make my background. Using lighter and darker blues gave my background depth instead of one flat color. I also left some places white to give it a little bit of a distressed look.

For this layout, I dug in my stash and found some yummy embellies that I had owned for a while, but had never used:

* Acrylic Photo Cover from My Mind's Eye-It added my border and my flowers to my picture!

* Canvas tag by Basic Grey (on left side)-Added some great texture

* Metal "Happy" (Pink Paislee) and "Three" Tag (Jillibean Soup)-these act as almost a "second" title

* Metal Flowers Brads and Acrylic Letters-The Paper Studio

* Grunge Key (Tim Holtz) and Wooden Letters (Pink Paislee)

I finished it off with some sprinkled and splattered blue Tattered Angels glaze (because kids are messy right?) and these fantastic little silver dots from a company called Candi Dots (this is a company out of the UK...check 'em out!)


What about you? Are you a one pic wonder or a fill-the-page kind of scrapper?

I would love to see your style! 

Leave me a comment!

Until next time friends...stay ONE-derful and stay creative.

XOXO,

KERI


Tuesday, October 1, 2013

Special Guest-Broken Girl


I am honored today to be featured on the Broken Girl blog, sharing my story of brokenness and transformation.

For a long time, I worried about sharing my past because I was scared of being judged.

However, I am now at this point... My embarrassment is far less painful than the hurting and suffering of those who NEED to hear my story and those who choose to be judgmental...my story is not for them anyway.

My story is hard to read; even for me at times, but it is my story and it has a happy ending.

I hope you will hope over there and read, not only my story, but some of the other entries on the blog.

My friend, Keri Bullington and Jennifer Watson, have an amazing heart for the hurting.

God Bless and have an amazing day.

XOXO

KERI